配置服务器并从OVHcloud模板安装Proxmox VE
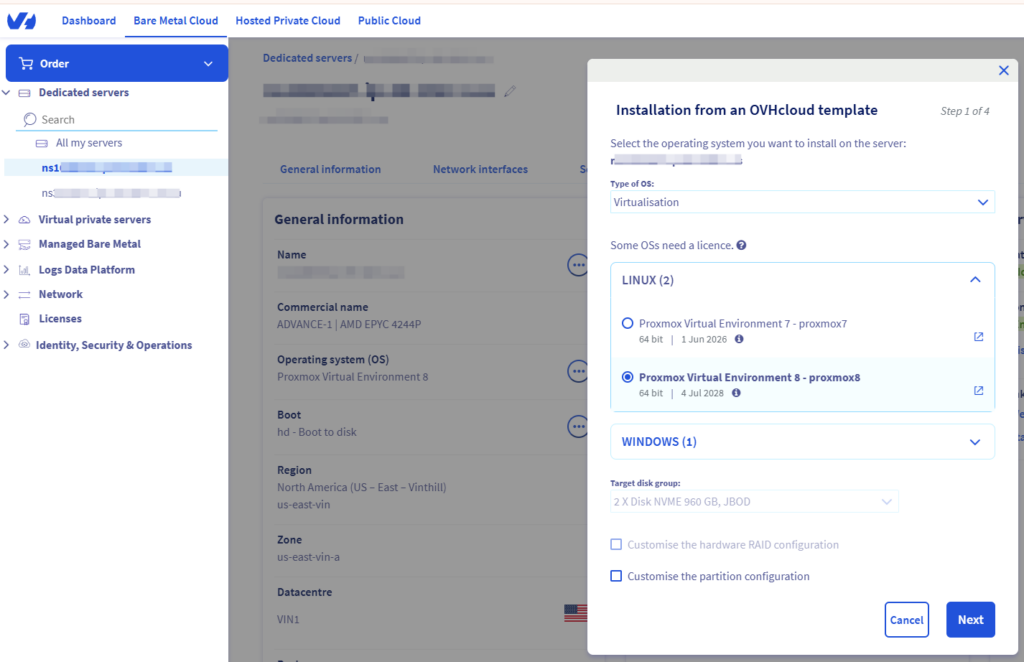
在OVH后台All my servers找到对应的Servers,重装系统选择“Installation from an OVHcloud template”,在Type of OS选项中,选择Virtualisation。
找到Linux选项卡,选择“Proxmox Virtual Environment 8 – proxmox8”,并点击下一步,后面的选项保持默认,并确认。
购买附加IP并获取虚拟MAC
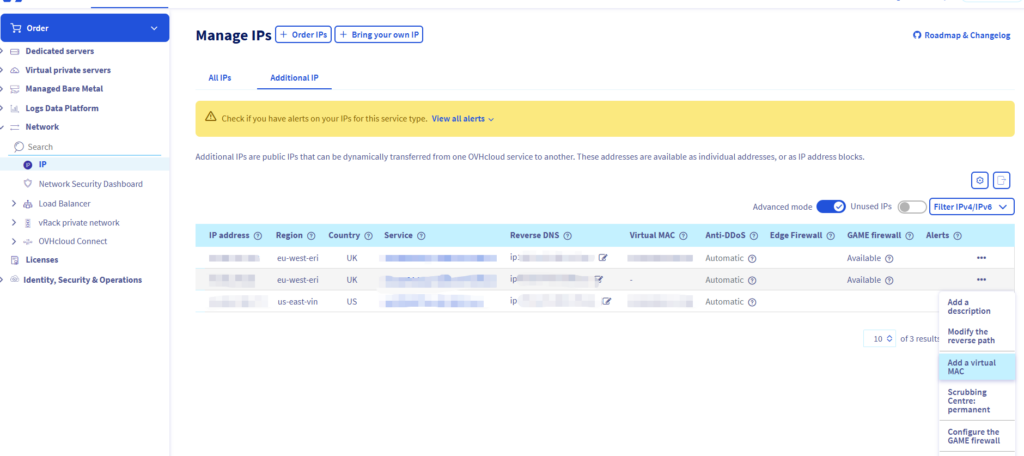
记录下购买的IP和对应虚拟MAC地址,后面要用到。
连接服务器
Proxmox VE安装好后,打开Proxmox VE的后台web管理界面。同时,使用Xshell通过SSH连接到服务器。
在服务器命令行中获取nameserver,后面要用到
cat /etc/resolv.conf切换Proxmox VE为免费源
编辑Proxmox的APT源文件:
nano /etc/apt/sources.list.d/pve-enterprise.list注释掉企业仓库(在行首加 #):
#deb https://enterprise.proxmox.com/debian/pve bookworm pve-enterprise添加Proxmox的免费仓库:
echo "deb http://download.proxmox.com/debian/pve bookworm pve-no-subscription" > /etc/apt/sources.list.d/pve-no-subscription.list更新APT包管理器并升级:
apt update && apt full-upgrade -y去除Web界面的订阅警告,网上有教程,不想弄。
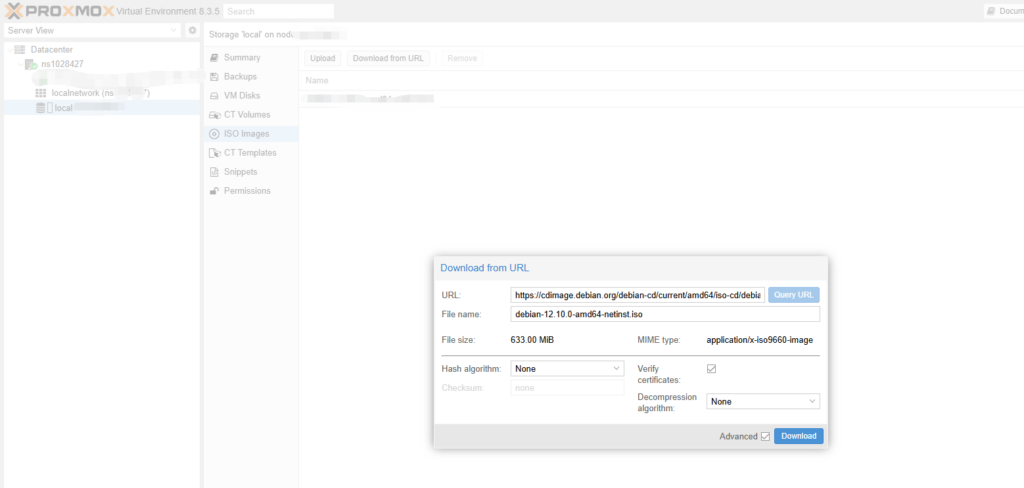
上传Debian ISO文件到Proxmox VE本地
https://cdimage.debian.org/debian-cd/current/amd64/iso-cd
注:此文件为在debian线安装文件,附加软件包需要在安装过程中,在线下载安装。
新建VPS主机
在Proxmox VE后台,Datacenter->nsxxxxx上,右键,选择Create VM,必要的选项:
- General选项卡下,填写Name
- OS选项卡下,选择刚才上传的ISO image
- System选项卡下,钩选Qemu Agent
- Disk选项卡下,填写Disk size
- CPU选项卡下,填写Core核心数
- Memory选项卡下,填写Memory
- Network选项卡下,MAC address中填写OVH的附加IP对应的虚拟MAC地址
以上为debian VPS的简单配置。详细的配置选项及说明,参考: https://pve.proxmox.com/pve-docs/chapter-qm.html#qm_virtual_machines_settings
安装debian12
- Proxmox VE后台,找到对应的VPS,选择Console菜单项,启动VPS
- 安装过程中,IP地址设置为OVH购买的附加IP,子网掩码255.255.255.255,默认网关为xxx.xxx.xxx.1,nameserver为上面步骤获取的nameserver,或者自己指定其它nameserver
- 安装步骤中,取消所有桌面软件包(根据自己情况),勾选ssh服务
- 设置root密码并新建用户,设置新用户密码
删除新用户,启用root ssh登陆(不安全)
# 列出所有用户
cat /etc/passwd

# 删除用户,并删除所有文件
deluser --remove-all-files xxx(用户名)

# 修改SSH配置
# PermitRootLogin prohibit-password 禁止 root 使用密码登录,但允许使用 SSH 密钥 登录
# PermitRootLogin yes 允许 root 用户通过 SSH 使用密码或密钥 登录
nano /etc/ssh/sshd_config

# 重启ssh
systemctl restart ssh
配置IPV6
ovh服务器配置IPV6不像IPV4那样需要vMAC,在PVE虚拟机中直接配置就可以。
- 查看主机IP的network信息,记下IPv6地址和IPv6网关

2. 修改/etc/network/interfaces
# /etc/network/interfaces
source /etc/network/interfaces.d/*

# The loopback network interface
auto lo
iface lo inet loopback

# The primary network interface
allow-hotplug enp6s18
iface enp6s18 inet static
	address 15.204.X.X/32
	gateway 15.204.X.1
	dns-nameservers 213.186.33.99
	dns-search ip-15-X-X.us

iface enp6s18 inet6 static
  address 2604:XXX:XXX:XXXX::2/56
	gateway fe80::1
3. 重启并测试
# 重启networking服务
systemctl restart networking

# 测试连通性
root:~# ping6 -c 3 ipv6.google.com
PING ipv6.google.com(yuiadrs-in-f101.1e100.net (2607:f8b0:4004:c23::65)) 56 data bytes
64 bytes from yuiadrs-in-f101.1e100.net (2607:f8b0:4004:c23::65): icmp_seq=1 ttl=54 time=2.65 ms
64 bytes from yuiadrs-in-f101.1e100.net (2607:f8b0:4004:c23::65): icmp_seq=2 ttl=54 time=2.56 ms
64 bytes from yuiadrs-in-f101.1e100.net (2607:f8b0:4004:c23::65): icmp_seq=3 ttl=54 time=2.48 ms

--- ipv6.google.com ping statistics ---
3 packets transmitted, 3 received, 0% packet loss, time 2003ms
rtt min/avg/max/mdev = 2.479/2.563/2.647/0.068 ms
其它相关命令
# 查看是否已正确配置 IPv6 地址
ip -6 addr show
# 确认默认路由和网关是否已正确配置
ip -6 route
ping6 fe80:0000:0000:0000:0000:0000:0000:0001  # 测试与网关的连接
安装 windows10 lstc
https://fedorapeople.org/groups/virt/virtio-win/direct-downloads/archive-virtio/?C=M;O=D
参考来源
Proxmox官方文档 QEMU/KVM Virtual Machines
Proxmox wiki – OVH OVH